9-STM32 UART COMMUNICATION-1
- ramazanycel
- May 7, 2024
- 2 min read
Updated: May 8, 2024
 | Previous Example | Example 9 | Next Example |  |
This project demonstrates the use of UART (Universal Asynchronous Receiver-Transmitter) communication on the STM32L476 microcontroller.
UART allows serial communication between the microcontroller and external devices such as a computer, another microcontroller, or a peripheral module. In this example, we'll configure the STM32L476 microcontroller to transmit and receive data via UART, showcasing basic serial communication functionality.
UART (Universal Asynchronous Receiver-Transmitter) communication is a widely used serial communication protocol for exchanging data between electronic devices. In STM32 microcontrollers, including the STM32L476, UART communication can be easily implemented using HAL (Hardware Abstraction Layer) functions provided by STMicroelectronics. Let's dive into how UART communication works with HAL functions:
1. UART Initialization:
To use UART communication, you first need to initialize the UART peripheral. This involves configuring parameters such as baud rate, data bits, stop bits, and parity settings.
HAL provides a function HAL_UART_Init() to initialize the UART peripheral. You need to create and configure a UART_HandleTypeDef structure with the desired UART settings and pass it to HAL_UART_Init().
2. Transmitting Data:
Once the UART peripheral is initialized, you can transmit data by calling the function:
HAL_UART_Transmit(huart, pData, Size, Timeout);This function takes the UART handle (UART_HandleTypeDef), a pointer to the data buffer to be transmitted, the size of the data buffer, and a timeout parameter.
The UART peripheral then sends the data over the serial interface according to the configured settings.
3. Receiving Data:
To receive data via UART, you can use the function:
HAL_UART_Receive(huart, pData, Size, Timeout);This function takes the UART handle, a pointer to the data buffer where received data will be stored, the size of the data buffer, and a timeout parameter.
When data is received, it is stored in the provided buffer, allowing your application to process or respond to the received data accordingly.
Required Parts For Example:
STM32L476 development board.
USB-to-Serial converter (if connecting to a computer's USB port).
Serial terminal software (e.g., PuTTY, RealTerm, Tera Term) for monitoring and interacting with the UART data.
Optional: External peripheral or another microcontroller for communication testing.
CUBEIDE Configuration Steps:
CUBEIDE Configuration Steps:
Create a new project in CUBEIDE.
Select the STM32L476 microcontroller variant.
Set Mode as Asynchronous.
Configure UART peripheral settings, such as baud rate as 9600 .

4. "If you are not willing to risk the usual, you will have to settle for the ordinary." - Jim Rohn
CODE:
void delay(uint32_t time_ms) {
// Simple delay function
uint32_t tickstart = HAL_GetTick();
while ((HAL_GetTick() - tickstart) < time_ms) {}
}
int main(void)
{
HAL_Init();
SystemClock_Config();
/* Initialize all configured peripherals */
MX_GPIO_Init();
MX_USART2_UART_Init();
while (1)
{
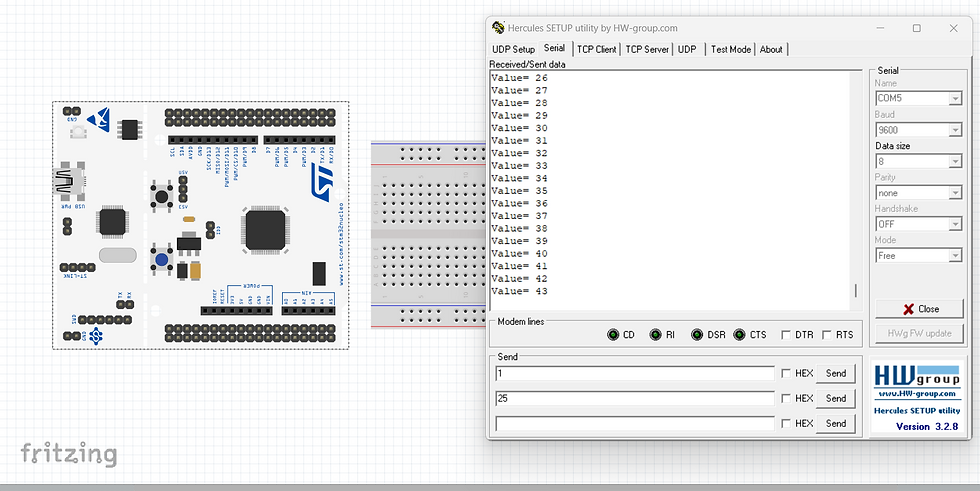
sprintf(msg, "Value= %d \n\r", ++value);
HAL_UART_Transmit(&huart2, (uint8_t*)msg, sizeof(msg), 100);
delay(500);
}
}Result
The STM32L476 UART project demonstrates bidirectional serial communication between the microcontroller and an external device or module.
Upon power-up, the microcontroller initializes the UART peripheral and continuously transmits a "Value=x" message at a fixed interval.
Users can monitor the transmitted data and interact with the microcontroller via a serial terminal software connected to the UART interface.
This example provides a foundation for implementing various UART-based applications, such as data logging, sensor interfacing, remote control, and more, leveraging the versatile serial communication capabilities of the STM32L476 microcontroller.
| Previous Tutorial | Example 9 | Next Tutorial | |

Comments