16-STM32 SPI Communication
- ramazanycel
- May 14, 2024
- 2 min read
 | Previous Tutorial | Tutorial 16 | Next Tutorial |  |
This project showcases how to interface a 2x16 LCD (Liquid Crystal Display) with an STM32L476 microcontroller using HAL (Hardware Abstraction Layer) functions. The LCD displays custom messages or data sent from the microcontroller, providing a simple yet effective user interface for various applications.

Interfacing an LCD with an STM32 microcontroller typically involves the following steps:
Initializing GPIO Pins: Configure GPIO pins for connecting to the LCD's data and control lines.
Initializing LCD: Initialize the LCD module by sending appropriate commands and data sequences. This may include setting up the display mode, cursor settings, etc.
Sending Data: Send data to be displayed on the LCD. This involves writing characters, strings, or custom messages to the LCD's DDRAM (Display Data RAM).
Control Commands: Send control commands to the LCD to perform various functions such as clearing the display, setting the cursor position, etc.
HAL provides functions to simplify these tasks, allowing for easier implementation of LCD interfacing in STM32 projects.
Required Parts For Example:
STM32L476 microcontroller board
2x16 LCD module
Potentiometer (for adjusting LCD contrast, if necessary)
Connecting wires
CUBEIDE Configuration Steps:
Configure GPIO pins for connecting to the LCD module. PA0;PA1;PA5;PA6;PA7;PA8 as OUTPUT set.
Add lcd.h and lcd. c
SET GPIO:

"It does not matter how slowly you go, so long as you do not stop."- Confucius
CODE:
lcd.h und lcd.c librarieschar line1[16];
int counter=0;
MX_GPIO_Init();
lcd_init(_LCD_4BIT, _LCD_FONT_5x8, _LCD_2LINE);
lcd_print(1,1,"Hello World");
HAL_Delay(1000);
lcd_clear();
while (1)
{
// Example usage
counter++;
sprintf(line1,"Counter = %d ",counter);
lcd_print(1,1,line1);
HAL_Delay(1000);
}
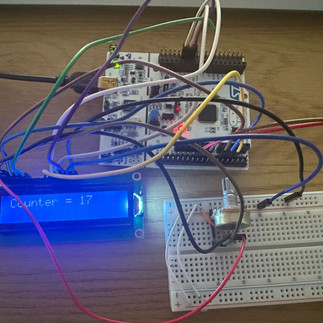
Result
This code initializes the GPIO pins for connecting to the LCD control lines and sends initialization commands to configure the LCD module. It also provides functions for sending commands and data to the LCD, clearing the display, setting the cursor position, and displaying strings. You can use these functions to interact with the LCD and display custom messages or data as needed.
Now it's your turn.
Those who can make the LCD screen reflect the value you receive from the ADC with the potentiometer on the LCD screen can share it in the comments to help their friends. Those who can't can ask questions in the comments.
| Previous Tutorial | Tutorial 15 | Next Tutorial | |

Comments