2-STM32 GPIO: Button-Toggle LED
- ramazanycel
- May 7, 2024
- 4 min read
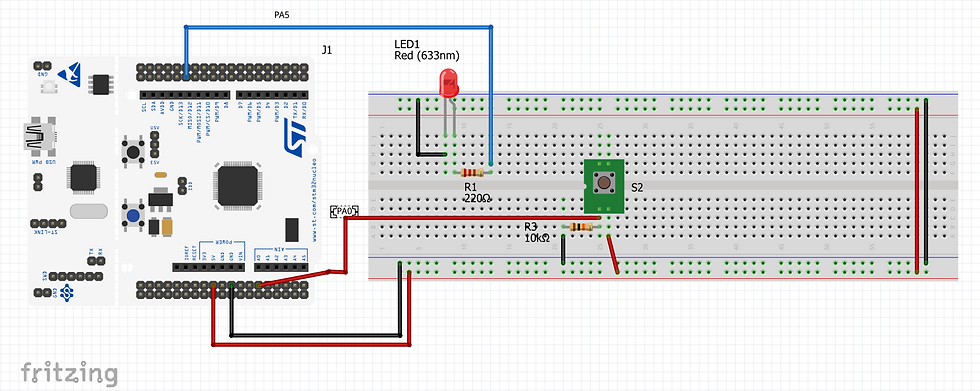
This project demonstrates an LED blinking project using the STM32L476 microcontroller, with the added feature of toggling the LED state using a button.
It serves as an introduction to GPIO input and output operations, as well as basic interrupt handling on the STM32 platform.
In this LED blinking project utilizing the STM32L476 microcontroller, we delve into the exciting realm of embedded systems by integrating an additional layer of functionality: toggling the LED state using a button. This enhancement not only expands the project's capabilities but also provides an excellent opportunity to explore GPIO input operations and basic interrupt handling on the STM32 platform.
At its core, this example builds upon the foundation of the traditional LED blinking project, where a microcontroller toggles an LED on and off at regular intervals. However, by incorporating a button into the circuit, we introduce a dynamic element that enables user interaction. This simple yet effective addition transforms the project into a more engaging and interactive experience.
Required Parts For Example:
STM32L476 development board.
LED (for blinking).
Push button.
220 Ohm and 10k Resistors for current limiting.
Breadboard (optional).
Working:
1-Toggle Method:
- Implement a function, let's call it toggleLED(), which toggles the state of the LED.
- Use HAL_GPIO_ReadPin() to check the current state of the button. If pressed (GPIO_PIN_RESET), call toggleLED().
HAL_GPIO_TogglePin(GPIOA, GPIO_PIN_5);2-Button Usage:
- Inside the main loop, continuously monitor the state of the button using HAL_GPIO_ReadPin().
- When the button state changes (pressed), execute the toggleLED() function.
HAL_GPIO_ReadPin(GPIOA, GPIO_PIN_0)3-delay() function: HAL_GetTick()
This function, named "delay", creates a simple delay mechanism in milliseconds using the HAL (Hardware Abstraction Layer) function HAL_GetTick(). Let's break down how it works:
- void delay(uint32_t time_ms): This line defines the function "delay", which takes an argument "time_ms" representing the duration of the delay in milliseconds. The function does not return any value (void).
- uint32_t tickstart = HAL_GetTick(): Inside the function, it initializes a variable "tickstart" of type uint32_t (unsigned 32-bit integer) with the current system tick count obtained from the HAL_GetTick() function. HAL_GetTick() returns the current time elapsed since the start of the system in milliseconds.
- while ((HAL_GetTick() - tickstart) < time_ms) {}: This line contains a while loop that continuously checks if the difference between the current system tick count (obtained again using HAL_GetTick()) and the initial tickstart value is less than the desired delay time "time_ms". If the condition is true, indicating that the desired delay time has not elapsed yet, the loop continues to execute. Once the condition becomes false, indicating that the desired delay time has elapsed, the loop exits, and the function returns control to the caller.
In summary, this "delay" function provides a simple way to pause the execution of the program for a specified duration in milliseconds. It is commonly used in embedded systems programming to introduce delays for tasks such as timing operations, debouncing buttons, or controlling the timing of certain actions.
void delay(uint32_t time_ms) {
    uint32_t tickstart = HAL_GetTick();
    while ((HAL_GetTick() - tickstart) < time_ms) {}
}
By leveraging HAL functions provided by STM32CubeIDE, we can efficiently initialize GPIO pins, toggle the LED state, and handle button inputs with minimal code overhead. This approach simplifies the development process and ensures compatibility across different STM32 microcontroller variants.
CUBEIDE Configuration Steps:
CUBEIDE Configuration Steps:
Create a new project in CUBEIDE.
Select the STM32L476 microcontroller variant.
Configure GPIO pin PA5 for the LED (output) and PA0 button (input).
Configure system clock settings.
Generate initialization code and project configuration.
"Success is most often achieved by those who don't know that failure is inevitable." -- Coco Chanel
CODE:
void delay(uint32_t time_ms) {
    // Simple delay function
    uint32_t tickstart = HAL_GetTick();
    while ((HAL_GetTick() - tickstart) < time_ms) {}
}

int main(void)
{
  HAL_Init();
  SystemClock_Config();

  /* Initialize all configured peripherals */
  MX_GPIO_Init();

  while (1)
  {
 	// Check if button is pressed
      if (HAL_GPIO_ReadPin(GPIOA, GPIO_PIN_0) == GPIO_PIN_RESET)
	{
      // Toggle LED state
      HAL_GPIO_TogglePin(GPIOA, GPIO_PIN_5);

      // Wait until button is released
      while (HAL_GPIO_ReadPin(GPIOA, GPIO_PIN_0) == GPIO_PIN_RESET));

      // Debounce delay
      delay(200);
      }
  }
}
Result
The STM32L476 LED blink project with button control now allows users to toggle the LED state by pressing a button.
Pressing the button changes the LED from on to off or vice versa.
This project enhances the basic LED blinking example by introducing user interaction, making it more engaging and interactive.
Users gain insights into GPIO input configuration, interrupt handling, and debouncing techniques, which are essential concepts in embedded systems development
Now it's your turn.
What I'm asking from you is to do something similar to the example above. In the example above, we changed the state of the LED when we pressed the button once. What I mean is, I want you to change its state after the button has been pressed twice. In other words, when you press the button for the first time, the LED won't light up; it will only light up when you press the button for the second time.


Comments